Wifi without internet connection. “No Internet access” when connected via Wi-Fi: how to fix it? Wi-Fi used to work, but stopped
Every user of the global network sooner or later faces the problem of accessing the network. There are many reasons, both software and hardware, why network access suddenly stops. In this article we will look at such a common error typical for Windows as “Unidentified network without Internet access.”
Why are we seeing this message?
Any difficulty regarding the Internet and any network in general can arise for one of two main reasons - the fault of network equipment or the fault of software. An error like “Unidentified network without Internet access” usually results from malfunctions in the computer software or communication devices. This may include the actions of malware blocking the network, incorrect settings of network services of the operating system, PC network equipment or external communication devices (wired or Wi-Fi router, modem or even provider equipment).
A message like this means that the computer is currently connected to some network, but does not have access to the World Wide Web. An existing network is a connection, for example, through a wired router or another computer, to a WiFi network, as well as to the provider’s equipment (if a computer or laptop is connected to the Internet via a cable coming into the room).
We will try to figure out why this happens, and also give solutions on what to do in such a situation.
ISP related problems
If the PC is connected via a network cable coming into the room from outside, then access to the global network is most likely blocked due to the fault of the provider. The reason may be a situation with equipment malfunctions on the provider's side - a short-term malfunction, incorrect settings of the hub, lack of communication between the equipment and the provider's server (possibly due to a broken cable connection). But in such cases, there is nothing left to do except wait for the problem to be resolved by the provider.
A similar problem can occur due to the provider blocking access to the Internet due to the expiration of the subscription fee or a deliberate termination of the provision of services (this happens, for example, in the case of DDoS attacks on the server from the client’s computer). The last case of shutdown is, of course, very rare, but still possible.
In the last two cases, the laptop will also be connected to the network (provider equipment), but also without access to the World Wide Web. This is why Windows writes to the user “Unidentified network without Internet access.”
Network settings
If there is accurate information about the performance of the provider’s equipment and the absence of blocking on its part, then the problem most likely lies in communication devices (for example, a Wi-Fi router), local network settings, or in the settings of the OS itself. All this can be checked directly from your computer.
If in your case a wired or WiFi router is used as a communication device, the problem may be hidden in incorrect IPv4 protocol settings. You can fix them as follows (it is recommended to do further actions in any case, especially if you access the Internet via a local network through a router):

Now your laptop or computer should display information about a successful connection to the network. If there is Internet, Windows will write in the “Network Center...” section in the “Access Type” item – “Internet”.
But what should you do if Windows continues to report that there is no connection? Open the IPv4 protocol properties window again, and change the value “0” in all fields to “1”, like here: 
The last step must be done in cases where the standard factory address of a wired or Wi-Fi router is different from “192.168.0.1”. If this address was changed by you or other users yourself, we recommend that you find it and enter the necessary data in the IPv4 properties.
For example, if your Wi-Fi router, which connects to a PC via a local network, has an IP address of “192.168.1.55”, then in the IPv4 settings in the “IP address” section you need to specify, for example, 192.168.1.10, and in “Default Gateway” and “Preferred DNS Server” change the last two digits to 1 and 55, respectively. 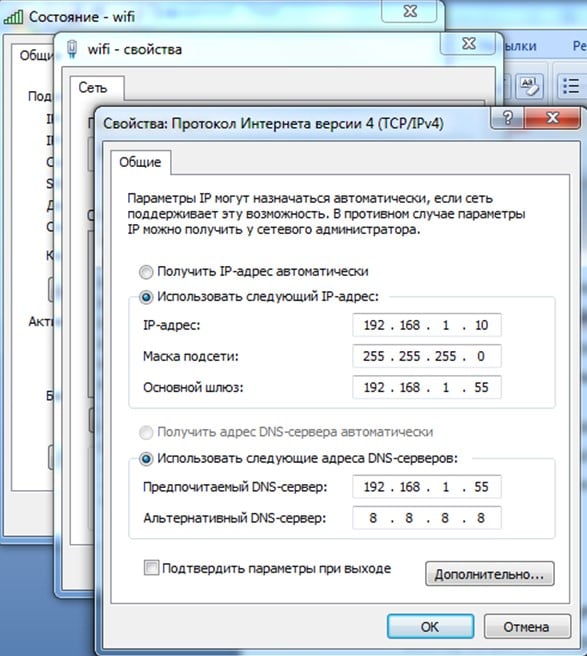
Does your laptop still say “No network access”? Then the Internet disappeared, most likely due to the settings of the wired or Wi-Fi router. But there is also a possibility that your laptop is experiencing connection difficulties due to a failure in the system’s network parameters. It can be fixed.
Resetting network settings
If the PC writes a message about the absence of the Internet due to a failure of the network parameters, then they can be returned to their original state by performing a few simple steps:

Windows also writes a message about the lack of access to the World Wide Web if the wired or Wi-Fi router has incorrect settings. There is a similar problem when the laptop connects to the Internet directly via a cable. If you have suspicions about this, then there is nothing left to do except call a specialist to set up your computer (but, most likely, you will have to set up a Wi-Fi router).
The difficulty of describing this problem in one article is that the provider may provide network access using one of several communication technologies - for example, ADSL or VPN. To connect a laptop or computer to the Internet, you need to obtain settings data from your provider, which, in most cases, is individual for each user and case. But describing them all is labor-intensive, so in such situations it is better to turn to specialists.
Before you begin to find out why Wi-Fi or the Internet does not work, you should know (especially for those who have just purchased a Wi-Fi router) that it is not enough to just connect the provider’s cable to the router, you also need to configure it (set up the Internet and Wi-Fi network ). All of the methods described below are valid if Wi-Fi and the Internet were working for you before, and then suddenly stopped or you cannot connect a new device to Wi-Fi. For convenience, I divided the article into two parts, the first is devoted to the inability to connect to a wireless network, the second part will answer your questions if you are connected to a Wi-Fi network, but there is no Internet.
Cannot connect to Wi-Fi network.
Reboot the router.
The first thing you need to do if you have problems connecting to a Wi-Fi network is to restart the router. To do this, simply disconnect the power supply from the router and connect it again after a few seconds. After 1-2 minutes. The device will boot, then try connecting to the wireless network again. To avoid such situations in the future, I recommend updating the router firmware (perhaps the manufacturer knows about the problem and fixed it in the new firmware).
Enabling the Wi-Fi module on the laptop.
Check if Wi-Fi is turned on on your laptop, I won’t bother, I described all the ways to turn on Wi-Fi in the article How to turn on Wi-Fi on a laptop .
Change the wireless network mode.
If you are trying to connect a device (laptop, smartphone) that is more than 5-7 years old, you must take into account that it may not support the modern Wi-Fi mode - n. Therefore, you need to switch the router to an operating mode that is supported by the device or enable mixed mode b/g/n. More details about Wi-Fi operating modes are described. In order to switch the wireless network mode, you need to go to the router’s web interface, go to the Wi-Fi settings and select the appropriate mode.
Removing a duplicate network SSID.
One of the possible problems of not being able to connect to Wi-Fi is a duplicate Wi-Fi network name (SSID). Suppose you come to your friends, their Wi-Fi network is called “Home”, you successfully connected to it. Time passed and you came across the same network name with other friends or at home. The laptop (this also applies to tablets and smartphones) tries to connect to the network using the previously saved password, but it fails because a new password is used for this name. To solve this problem, you need to remove the matching network from the list of saved Wi-Fi networks.
To do this, right-click on network icon in the lower right corner of the screen and select "Network and Sharing Center."

After this, you will see a list of saved wireless networks. If you see that the network you are trying to connect to is in this list, you need to remove it from this list. Select the network and click the "Delete" button. After this, you will need to enter a password to connect to the wireless network.

No Internet via Wi-Fi.
Internet payment check.
The simplest thing that can happen when the Internet is not working is that it’s time to pay for it or the provider is working on it. To clarify the situation, call your provider and find out if you have a debt for the Internet and whether work is being done on the line.
Static IP address.
One of the problems with the Internet not working may be that the registered static address does not have the network settings that are necessary. In this case, I recommend using automatic network settings retrieval. To do this, you need to go to the Network and Sharing Center. One way to do this is to right-click on network icon in the lower right corner of the screen and select "Network and Sharing Center".

Another way is to use hotkeys

It doesn’t matter which method you used, the result will be the same - the Network Connections window will appear on the monitor. Next, you need to double-click on the wireless connection. In the status window that opens, select “Properties” in the properties window “Internet Protocol Version 4 (TCP/IPv4)”


Problem with the router.
The Internet may not work due to a router failure; the simplest thing you can do is reboot it. There are situations when the router resets the Internet settings, in this case you need to connect to it via the web interface and re-enter the Internet settings, in order to experience fewer problems with the router in the future, I recommend updating its firmware.
Conclusion
In this article, I described all the ways I know to solve problems with Wi-Fi and the Internet. If these methods do not help you, you can describe the problem in detail in the comments and I, together with the readers of this site, will try to help you.
⭐️⭐️⭐️⭐️⭐️ Now I will tell you what to do when there is no Internet via WiFi on your Android phone. Those. The network connection itself is there, the Wi-Fi icon is active, but it’s impossible to access the Internet and instant messengers (Telegram, Viber, Skype) and other applications (Instagram, VKontakte, etc.) do not connect.
This article is suitable for all brands that produce phones on Android 10/9/8/7: Samsung, HTC, Lenovo, LG, Sony, ZTE, Huawei, Meizu, Fly, Alcatel, Xiaomi, Nokia and others. We are not responsible for your actions.
Attention! You can ask your question to a specialist at the end of the article.
I'll notice! If you use a public WiFi network or a private corporate one, then there is a high probability that they will block some social networks and instant messengers. This is often practiced and you will have to come to terms with the situation.
In most cases, rebooting the smartphone or router that distributes the wireless network helps. Another reason could be a software error in the phone’s operation or incorrect router settings.
No internet due to a glitch in Android itself on the phone
Reboot your phone. If the problem was caused by a minor system glitch, restarting the system will fix it.
After restarting if the error persists, you will need to “Forget the network” and then reconnect to it.
Forgetting the network and reconnecting helps resolve the mismatch between the Wi-Fi settings on your phone and router.
If deleting the network does not help, check the proxy server status on your phone. It should be turned off:
- Go to the “Wi-Fi” section of the settings and select the network to connect to.
- Check the "Advanced" option.
- Make sure the Proxy Server field is set to No.
 Increase
 Another reason that the phone does not connect to the Internet may be the wrong date. To check and change it:
- Open settings.
- Select the "Date and Time" section.
- Set the time and date manually or check the “Network date and time” and “Network time zone” checkboxes.
 Increase
 After setting the correct date, connect to Wi-Fi. If the wireless network actually works, you will be able to access the Internet.
Checking Internet access
Before using your smartphone or router, make sure that everything is ok with the Internet. What could be wrong with it:
- You didn't pay, so your provider suspended your Internet access. Make sure there is network access through the wire.
- The router settings include restrictions on visiting certain sites or a traffic limit (common practice for open networks in public places).
- There were problems on the provider's side.
After eliminating these factors, proceed to diagnostics, allowing you to understand in the operation of which device the cause of the problem is hidden.
The easiest way is to connect to the wireless network from another phone/tablet/laptop. If another device connects to the network, then the problem is in the phone, which cannot establish a correct connection.
Checking and setting up the router
If, as a result of some kind of diagnostics, you find out that they occur on all devices that connect to the same wireless network, then look for the cause of the error in the router settings.
First of all, reboot your router. Unplug it for 10-20 seconds, then turn it on. Make sure that the device is close enough to the wireless network source so that nothing interferes with the signal.
Look at the settings and try changing them a little:

When connecting to an open public network, check that you have completed web authentication. Usually, when you try to connect to Wi-Fi in a shopping center, a browser launches with a page for entering a phone number. If you don't do this, you will be connected to Wi-Fi without access to the Internet.
We all use the Internet while in cafes or restaurants, with friends, even at home at the dinner table, checking mail or messages on VKontakte. As practice shows, one of the most common problems occurs when working with Wi-Fi wireless technology. Let's say our access point is located in the house from the router or in a public institution. Everything seems to be configured correctly, but for some reason there is no access to the network.
So, what to do if you encounter such a problem? In fact, there may be a dozen reasons, each of which we will consider in this material!
Wi-Fi on Android is turned on, the status is “Connected”, but there is no Internet access
Let's say that you have activated Wi-Fi on your smartphone and connected to an access point. Your phone displays the “Connected” status, but you cannot access the Internet, either using a browser or through other programs, for example, Odnoklassniki. What should we do in this case?
First you need to check whether the Internet works for this connection at all. That is, you need to gradually filter out the list of possible causes using the method of elimination, and checking the Internet is the very first of them.
Try connecting to this access point from another device and go online. If everything is fine, then the problem is in your smartphone. If another device does not connect to the Internet or does not open websites, then the problem is in the access point or router itself.
Solution 1 – Correctly setting up your router for Wi-Fi
First, check if your smartphone is within range of a wireless network. Typically, routers can distribute a signal up to 200 meters, provided that there are no obstacles within this radius. If everything is okay with this, then move on to the router settings.
Change the channel your access point is on. Usually it is set to Auto, but we advise you to set it to channel 6 or another. Select any of the available ones, save the changes and check the functionality.
You can also change the operating mode for Wi-Fi. As practice shows, by default the 11bg mixed mode is usually set everywhere. Change it to 11n only.
If you have a column in the settings for specifying the region, then be sure to set your region there. This is a minor parameter, but in very rare cases even it can affect the correct operation of the access point.
Solution 2 – Setting up a proxy server
Another possible problem is the automatic selection and installation of a proxy server for a specific access point on a wireless network.
To fix this:
- Go to Settings on your device
- Next, select Wi-Fi or “Wireless Networks”, depending on the version of Android
- Find the access point you are connected to and hold your finger on it for a few seconds. An additional menu will appear in which you need to click “Change network”
- Check the box next to "Advanced options" and select "Proxy settings"
- All that remains is to check the box next to “No”, after which the proxy server will be deactivated
Wi-Fi is enabled on Android, but Google Play and other apps are not working
If Wi-Fi is activated on your smartphone and it is connected to a certain access point, but the phone does not open websites or load pages and applications on Google Play, check that the time and date settings are correct. This is a very common user mistake! In 90% of cases, it is this that causes connection problems.
You just need to set the time and date correctly, reconnect the Internet, then try to log into Google Play and view one of the applications on the page.
Why Wi-Fi doesn't work on Android: other reasons
- Incorrect password. Sometimes the Android operating system stores the password for a certain access point, but when you subsequently connect to it, no notification appears that the password is incorrect. We advise you to check the correctness of your entry and change it if necessary. As you understand, public places usually have open access points, but there are also closed ones. To select a password for them, you can use special programs, for example, from the same Google Play, where users share information around the world.
- Software problems. Another common reason that is related to your system software. To check the correct operation, you can use the Wi-Fi Fixer application. Just install it on your device and run it. There you will also be able to view a complete list of networks for which the data you have previously connected to has been saved. Restart your phone and try connecting to the hotspot again.
- Malicious applications. There may be viruses or Trojans on your phone that are blocking wireless networks. In this case, you will have to manually install an antivirus, for example, Kaspersky.
- Incorrect settings. We have already talked about setting up Wi-Fi networks. If you can’t change them, you can simply reset to factory settings. You may also have old entries about the access point. For example, you connected to it, as it says in the system, although the connection was not actually made. Just update the list of networks in the settings or delete everything and try updating again, and only then connect to a specific Wi-Fi point.
But what should you do if Wi-Fi is connected, but the Internet still does not work even after all the recommendations described? Most likely, your Wi-Fi module itself is not working correctly. The following will help:
- Phone firmware, if the reason lies in the software part of the smartphone. If you do not know how to flash Android operating systems yourself, it would be better to contact a service center.
- Repairing the Wi-Fi module. If the phone's firmware does not help, then the problem lies in the wireless network module itself. In this case, you will have to take the smartphone to a service center and have the parts replaced.
This is not a complete list of reasons that cause Wi-Fi malfunctions. If you have encountered similar situations and you solved them in some other way, be sure to tell us about it in the comments for our readers!
In the PC IP address text field, you need to set the address of the router (router).
In the “Default gateway”, “DNS server” text field, enter the router’s internet protocol address (the same IP address of the router). At the end of everything, we confirm our actions by clicking on the “Ok” button.
Second way.
We need to go to the router settings interface and set the range of IP addresses assigned by the router automatically. Make sure that it does not include the PC IP address that we specified manually.
Type URL – 192.168.1.1 in your browser, log in and the router’s admin panel will open in front of you.

There we need to find “Local Network” and go into the DHPC server settings.

In the “Starting address of the IP address pool” item, enter an arbitrary address that follows the PC address that we set manually (192.168.1.2). Finally, click on the “Apply” button.

I entered the following numbers - 192.168.1.5. Now the router automatically sets addresses for each device, starting with it.
If you do not know the IP address of the router, then take a look at it. As a rule, the manufacturer indicates at the bottom all the data about the device, including the IP address.
