Denial of access to the windows 10 folder. Fixing the error "Disk access denied. Open access with the takeown command
Hello dear friends! When working with folders and files, I often have one problem. It manifests itself in the fact that when you try to delete, insert or rename some folders, the message " Access denied”, Personally, this is very annoying to me. I'm sure that every second person has exactly come across this and will clearly understand what I'm talking about.
The most amazing thing is that I am the administrator of the computer, and as you know, the administrator has full access to the computer and can delete, edit any file or folder. But, sometimes there are some cases in which the folder becomes inaccessible. For example, after reinstalling Windows or after copying it from an external drive to the computer's HDD.
In general, let's see what can be done if, when performing any actions, an "Access Denied" error appears on a folder.
We return access to the folder with the error "Access denied"
This example will work for all operating systems. But, in Windows XP there is one small snag. Before you begin to perform the basic steps to obtain rights to the folder and get rid of the "Access Denied" error, you need to disable the simple type of file sharing in the folder properties. For all other operating systems, this value is disabled by default.
So, to disable sharing, go to some folder or " My computer” and in the top menu we find the item properties. By clicking on it, a drop-down menu will appear, where we click on "".

Next, click on the tab " View”, in the list of parameters we look for the line “ Use simple file sharing(recommended)." And to save the edited parameters, press the button " OK».

Basic Steps to Fix "Access Denied" Error on a Folder
We find the folder to which we need to get full access to editing, and right-click on it, where in the menu that appears, select "".

Now, click on the tab " Safety"where we find and click on" Additionally».

Now, separately for each operating system. Let's start with Windows XP and Windows 7, since these OSes have the same owner assignment setting.
Windows XP and Windows 7:
Pressing " Additionally”, the security settings window will appear. And already there we go to the tab " Owner", in which we click on the button" Change».

Further, we will see information about who the current owner is and a list of users who can be appointed by that owner. So, as I want to indicate the owner of my account, I designate it by clicking on it with a bear. Also, in order to become the owner of all files contained in the folder, check the box next to " Replace owner of subcontainers and objects." Next, click " OK» to apply all settings.

If the "Access Denied" error to the folder reappears. We are trying to select the administrators group, it will also work, because our account has full administrator rights, and thus falls into the list of users of this group.

Windows 8:
As for Windows 8, here the file owner setting has been slightly changed.
So, going into the security settings, we see that the name of the owner of the selected folder or file is immediately displayed on top. And in order to select another user as the owner, click on the button " Change».

A user selection window will appear, where we must specify the name of the account to which we want to transfer rights. For example, my account is called “Igor”, so I enter it in the field of selected objects and press the button “ Check Name". If everything was spelled out correctly, the name of the computer should appear before the name, for me it looks like this: “ MSI-Z77\Igor", and as always, save the changes with the button" OK».

Now, you can do whatever you want with the folder, since all rights on the folder now belong to you. And the file access denied error will disappear forever. I want to mention that on many computers, the account may be exactly “Administrator”, so if you did not create an account during installation, then use it. In any case, if you have any questions, leave them in the comments and we will definitely find answers to them.
What to do if "Access Denied" appears on a folder: 10 comments
Hello, turning on the computer, I found on the monitor the absence of all icons, (Windows7) a sign listing where exactly I was denied access and the keyboard was unwilling to “speak” Russian. All desktop folders were in the administrator folder, office programs - “access denied”, and Chrome worked fine, there was access to the mail. First, I adapted to transfer the documents I needed to the mail.ru cloud, and there they were safely opened and even printed.
I read a lot of advice on the Internet on how to restore normal operation, and because. the time was later I decided to deal with this problem in the morning, but just in case, I downloaded the free Dr.Web utility and set the check for the night. The check ended and I turned off the computer. Turning it on in the morning, I found that everything works fine, even the keyboard “spoke” in its native language.
Thanks, it helped on win 7, but a lock appeared on the folder and it is system. Solved the problem by copying the contents to the new "Plain" folder and deleting the old folder with confusing settings. Suspicion fell on the parental control program Time Boss. I put a ban on entry for another account, but as it turned out, it was closed to everyone. Removing the settings did not change anything. Even in DOSe I couldn't get into it.
Hello, I can’t delete the current account, it says access denied, what should I do, please tell me
You can find a dozen cases on the network when a user cannot access the F, C or D drive on which Windows 10 is installed. As a result of such an error, Windows 10 fails to boot and the PC, in fact, becomes inoperative. What to do in this case, what actions to take to solve the problem?
Causes of a Locked Disk Problem
If, when you turn on the PC, a message appears on the monitor screen stating that there is no access to the D drive or Windows 10 is denied access, this indicates that the 100 MB boot partition (System Reserved) is damaged or missing.
Also, the causes of this problem include:
- Upgrade PC from Windows 7 or Windows 8 to Windows 10;
- Lack of the Intel Rapid Storage Technology driver, which is required for the correct functioning of Intel Smart Response Technology (SRT);
- Transfer Windows from HDD to SSD.
There are several ways to solve this problem, but you can’t do without an installation disk.
Ways to solve the problem
If the drive on which Windows is installed, be it C or F, is locked, you should do the following:
- We boot into the BIOS and set the priority of booting from disk. Boot from the installation media. At the initial stage, select the installation language and region. We click "Next".
- Next, select "System Restore".

- A window titled "Select Actions" will appear. Select "Diagnostics".

- In the new window, click "Advanced Options".

- In the "Advanced options" select the item "Command line".

- Next, we enter these commands in turn. After entering each, press "Enter".
select disk X, where X is the drive letter on which Windows 10 is installed;
- A list of disks should appear. It should also display a 100 MB partition. If not, enter the following commands.
create partition efi size=100;
format quick fs=fat32 label="System";
assign letter="S";
- Do not close the command line. The exit command is required to exit the diskpart utility.
- Next, enter the following commands on the command line:
BCDBoot c:\Windows /s s: /f UEFI.
After executing this command, you need to remove the installation disk and reboot the system (do not forget to set boot priority from the hard disk in BIOS).
Also, there is another method on how to unlock the F or C drive on which Windows 10 is installed using the command line. To do this, we do all the same steps on how to get to the command line, as described above. When the console is launched, it is worth entering the following commands:
bootrec /fixmbr;
bootrec /fixboot;
bootrec /rebuildbcd.
These are commands for repairing damaged hard disk partitions. They will also help solve the problem when the hard drive is locked.

After installing the software and rebooting the PC, the message asking "Unlock the disk ..." will disappear and the system will boot normally.
It happens that Windows 10 refuses to give users access to files and folders stored on the computer. Basically, this problem is due to the fact that users do not have the appropriate rights, even though they have an account with administrator rights. This usually happens in the case of system files / folders, or those that previously belonged to a user whose account no longer exists. What to do if access to a file or folder is denied in Windows 10? If this problem also torments you, this instruction should help you, which describes, how to get full access to files or folders in windows 10.
Get full access to a file or folder in Windows 10 through File Explorer
- open Conductor and find the desired file or folder. If you don't see the file or folder in File Explorer, don't forget the .

- Right-click on a file or folder and click on Properties.

- Go to Safety and click on the button Additionally.

- In the window Additional Security Options click on the link Change.

- Press Additionally - Search.

- From the list of users and groups, select your preferred owner and click OK.
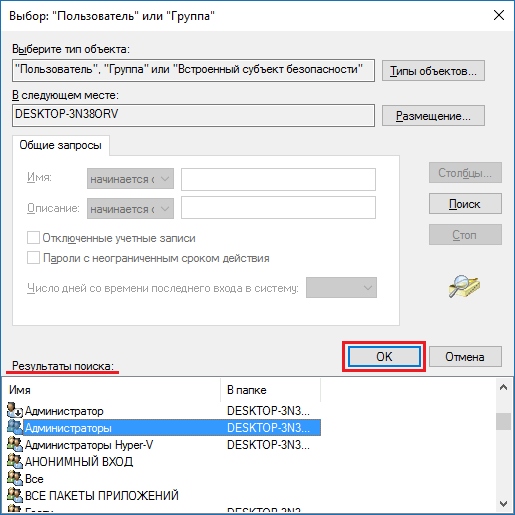
- Check the box next to Replace owner of subcontainers and objects, and click on OK.

- Right-click the file or folder again and open Properties – Safety.

- Press Additionally – Add.

- Click the link Select subject.

- Press Additionally – Search, select a subject from the list and click OK.

- Under the inscription General Permissions check the box next to Full access and click on OK.

- Put a check next to the item Replace all permission entries of a child object with those inherited from this object.

- Press OK to apply all changes.

Take Ownership of a File or Folder in Windows 10 Using the TakeOwnershipEx Utility
Alternatively, you can use the TakeOwnershipEx utility. It allows you to change the owner of a file or folder and get full access to them in a few simple clicks. Users just need to do the following:

Was this guide helpful? Did it help you solve the problem with accessing files and folders in Windows 10? Write your answer in the comments.
Windows folder access denied | access denied windows 10
Solved "You do not currently have permission to access this folder" Windows 10
Folder access denied in Windows systems: If you are facing problems trying to access files and folders on your computer, then you have come to the right place.
“You do not currently have permission to access this folder” Click Continue to permanently access this folder, this is a pop-up message that Windows throws at you when you try to access or open a folder on your computer.
When you click Continue, another message pops up that says "You have been denied access to this folder." In order to access this folder you will need to use the security tab.
The security tab is a hyperlink, so you click on it to open the properties window to set Windows permission denied issues. You play around with the settings and nothing happens.
- How to Fix Folder Access Denied or File Access Denied Error Messages?
- How to set Windows 10 folder permissions to Windows folder access permission denied issues?
- How to take charge of Windows 10 Files and Folders?
- How to change file permissions in windows 10?
I systematically show how to take ownership of a file, how to change permissions in Windows 10.
In order to take ownership of any file or folder, you must first be logged in as Administrator.
The solution to access the folder is given below. We will do it in 3 steps via folder security tab .
You must obtain permission from administrators to make changes to this file.
Use to allow multiple folders Windows 10 to access.
STEP 1: Change ownership of the Windows folder
- Right click on the file or folder you need to access and click on properties.
- Click on security
- Click the Advanced button
- Click on change => Select “user or group” A window will pop up.
- click the "Check Names" button
- Click Ok
- Check ‘Replace owner on subcontainers and objects’
- Click the Apply button
- Press the OK button in the Pop-Up Box.
- Click the OK & OK button to close all open windows.
STAGE 2: Kit for Windows 10 file permissions
- Again, right-click on the file or folder you want to be able to access and select Properties
- Click on security
- Click the Advanced button
- Click on the 'Add' button under the audit tab
- Click on the “Select Principal” button
- In the opened window "Enter the name of the object to select" Type YOURUSERNAME
(Where YOURUSERNAME is your user account name)
- Click the "Check Names" button
- Click OK. close the 'Permission Entry' window.
- In the already opened “Advanced Security Settings” window. Check ‘Replace all child write permission objects…..’
- Click the Apply button => click OK.
STEP 3: Allow folder access for the user
- then, again, right-click the file or folder that you should have access to.
- Click Properties => Security => Edit => Under 'group or usernames' Select 'YOURUSERNAME'
- Placed tick marks under “Allow” Click OK & OK to close the windows.
This is it, you did! You now have full access to do whatever you want with the corresponding file or folder.
If windows 10 program files have the required permissions, this method can be applied to the Program Files folder or subfolders too.
If the Security tab is not in the folder options, Go to
short video on how to take ownership of the windows folder i'm setting up.
Be careful if you need a step by step guide.
Change ownership of files and folders with a registry hack. The easiest way to solve Permission denied windows folder 10
- Download to desktop.
- Extract the file: Right-click on the file and select 'Extract All...'
- Then right-click the extracted file “EnableTakeOwnershipWithOneClick” and select “Merge” from the drop down list.
- Click the ‘Yes’ button on the User Account Control” pop-up window.
- Click the ‘Yes’ button again ‘Are you sure you want to continue’
- Click OK.
- Then right click the folder you want to take ownership of. From the drop-down menu, select "Change Ownership of Files and Folders".
- Click the ‘Yes’ button for User Account Control” pop-up window.
The Prompt active command window will open showing the progress of the process.
This may take some time to process depending on the number of files and folders in the folder you want to take charge of.
When completed, the command prompt window automatically closes.
The time it takes to complete the process depends on the number of files in the folder. It can take from 2 to 12 Minutes or higher in full ownership.
After the above steps completed successfully, try to open the corresponding folder to check the 'You do not currently have permission to access this folder' issue has been resolved.
Now, you have full access to the folder.
Please note:
The same method described here can be used to take charge and change folder permissions for Windows 7, Windows 8, and Windows 8.1 too.
The "bootrec/fixboot access denied" message in Windows 10 often challenges users on how to fix the error. Let's analyze the reasons and sequence of actions.
The appearance of a message like "bootrec / fixboot access denied" appears, most often due to incorrect actions of the users themselves. For example, when trying to resize a disk. However, sometimes this error appears after a system update or virus exposure.
Denied access to bootrec/fixboot means that the boot record is corrupted. There can be many reasons for this damage. Aside from playful pens trying to set up booting manually, the boot record can be corrupted, for example, if the computer was turned off while the update was downloading. Or during sudden power surges, when the power supply could not cope with holding the load.
What to do if "bootrec/fixboot is denied access" error
First of all, you will need a Windows 10 boot disk, USB, or other operating system media to fix boot record corruption and resolve the "bootrec / fixboot access denied" message.
After installing the boot disk, you must restart your computer.
When the system boots, click on the "System Restore" or "Repair your computer" button in the lower left corner of the screen.

At the command line, enter the following commands in sequence:
- bootrec.exe /rebuildbcd
- bootrec.exe /fixmbr
- bootrec.exe /fixboot
After that, you need to exit and reboot the system.
In most cases, this sequence of steps will resolve the bootrec/fixboot access denied error. If the message appears again, repeat the entire sequence of actions, but at the end add one more command:
- bootsect/nt60sys
- press Enter and reboot.
Once again, note that the “bootrec/fixboot access denied message” in Windows 10 indicates problems with the master boot record, so experimenting with fixing them must be done with care and skill.
Please complete the survey below the article if you have used the suggested method.